| « A Microsoft Access Front-End Updater | Overcoming Access Switchboard Limitations » |
Menu Manager as the New Switchboard Manager
This series of posts has been talking about using Switchboards in Microsoft Access. Prior entries looked at ways to customize the Switchboard and how it functions, how to edit the Switchboard Items table, and the limitations of the internal Switchboard Manager. This entry is about building a new Switchboard Manager to support features added to the Switchboard system.
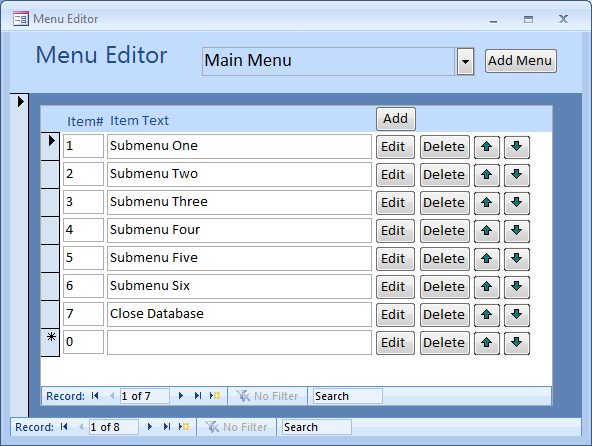
In this entry I introduce the Menu Manager. The Menu Manager is my version of the Switchboard Manager. Instead of the form Switchboard, I use frmMenu. Instead of the Switchboard Items table, I use tblMenuItems, and for the Switchboard Manager I use frmMenuEditor and related subforms. However, the Menu Editor is just a glorified Switchboard Manager so you could use it with your improved Switchboard and the default Switchboard files.
While the menu only requires the menu form frmMenu and the menu item table, tblMenuItems, the Menu Editor requires three tables, a query, and three form objects. Before mapping the steps I took, here's a description of the objects being used in the Menu Editor. The Menu Editor (frmMenuEditor) uses a subform (subfrmEditMenu) and reads the menu item table (tblMenuItems) to show options selected for the menu. When you click to edit one of the items a popup form (subfrmEditMenuItem) is displayed so that you can select commands and available arguments for each command. The information for this form is gathered from tblMenuCommands, tblMenuCommandTypes, and a query, qryObjectTypes that finds relevant objects in the system's MSysObjects table.
Reading the Menu Items Table
Now, let's look at the fields in the Menu Items table. As previously mentioned, the table that runs the menu is tblMenuItems and the combination of SwitchboardID and ItemNumber fields make an entry unique. The ItemText is what is displayed. The Command is a number that refers to the command in the code behind the menu form. The Argument can be either the object being opened, or a number that refers to another menu. When the menu and the menu editor opens a new menu, it restricts the items read to those with the designated MenuID. Those items are then displayed in item number order.
Editing Basics
There are three levels of editing, and a form for each level. First, the Menu Editor main form (frmMenuEditor) only reads in each menu title. This is done with a query of tblMenuItems where Item Number is 0. That imports all of the menu titles. The current setup allows you to select the menu you want to edit from a combo box at the top of the form. On top of the drop down is a textbox that is used to enter the title for new menus.
Next, the Menu Editor subform (subfrmEditMenu) reads in the items from the same table, except that only items <> 0 are included. Of course, there is a link between the parent and child forms so that only items for the active menuID are shown.
Finally, each menu item is edited in a popup form that must get the menu text, the command, and possibly an argument. Editing the menu items is where the most effort is concentrated.
Editing the items
When adding or editing new commands there are three fields that need to be supplied in the item editor. The first is the text to be displayed in the menu. The second is the command. The third is the argument. The text that is supplied is as simple as typing it in.
The command requires a little more prompting, so a combo box is provided. Although the command refers to a number, we need a list of commands that we can select from. tblMenuCommands is the table that is used to display the prompt for each of the commands. The menu title item has no command or arguments so no editing is required. The other menu items, however, must be edited to provide command and in most cases, argument.
The argument requires a little more explanation. If a command requires an argument, which is usually the case, we have to show an appropriate list of arguments. If the command involves opening a form, we don't want to also list tables or reports. Again, a combo box is shown for the user to select a valid argument. To get the list of items for the particular command that we are building, we use code to set the RowSource for the Argument field to match the object type.
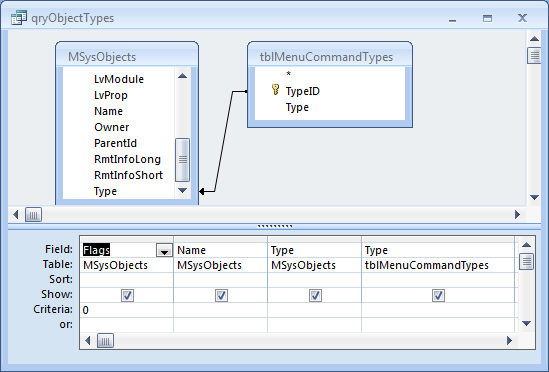
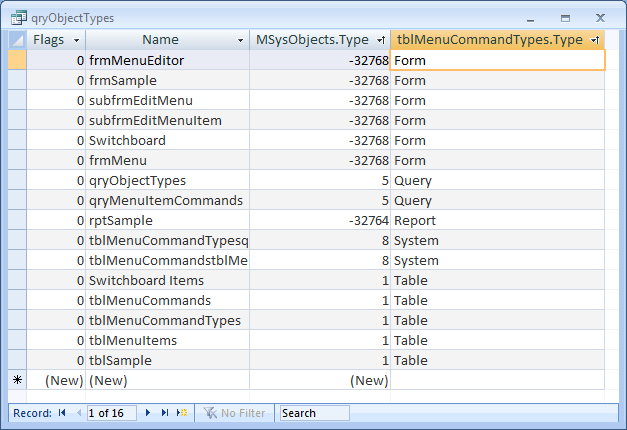
The query, qryObjectTypes is the source we use to get the list of objects that we can work with. The first step is to filter the MSysObjects table to show only valid user arguments. Extracting the related arguments involves searching the MSysObjects table. MSysObjects has other objects that we normally don't access. To limit the list to items that we can use, the criteria for the list limits items with a Flag of 0.
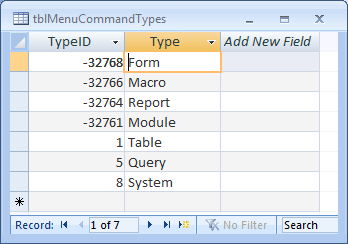
The next step is to match the list of objects with the object type that the command uses. Instead of hard-coding the types for each, I created a table with values to match for each object type. It uses tblMenuCommandTypes as a reference table to look in MSysObjects for the objects of that type. If the value of the system Type matches the command Type in the tblMenuCommandTypes, then the object qualifies as an object. For example, if the type is -32768, then the object is a form.
This is the table I use to match objects with the type I'm using.
This is the query that extracts from MSysObjects based on the the table of menu commands.
.. And the results from the query
Finally, the query is used to select the appropriate list of objects. This is done using code behind the edit menu item popup. In order to simplify execution and limit the amount of coding, I used the same constant-naming convention as was defined in the menu and I re-used the Select statement for setting the Row Source for each item. Following is a snippet from the code behind subfrmEditMenuItem, the popup that is used to set up an item in the menu.
Const conCmdRunCode = 8
Const conCmdOpenTable = 9
Const conCmdRunQuery = 10
Select Case Me.Command
Case conCmdGotoMenu
Me.Argument.RowSource = "SELECT MenuID, ItemText, ItemNumber FROM tblMenuItems WHERE (((ItemNumber)=0));"
...
Case conCmdRunCode
Me.Argument.RowSource = "SELECT Name, Name FROM qryObjectTypes WHERE (((MSysObjects.Type)=-32761));"
Case conCmdOpenTable
Me.Argument.RowSource = "SELECT Name, Name FROM qryObjectTypes WHERE (((MSysObjects.Type)=1));"
Case conCmdRunQuery
Me.Argument.RowSource = "SELECT Name, Name FROM qryObjectTypes WHERE (((MSysObjects.Type)=5));"
Notice that the display is a bit tricky. The combo box displays the Menu name (ItemText) for a Goto Menu command, and stores the MenuID as the argument. For the other arguments, what is displayed and stored is the same.
Coding for Renumbering, Deletions, etc.
While discovering how to set appropriate arguments is an accomplishment, there is still much to be done to get the Menu Editor fully functional. For one, we need to increment the item number when we add new items. We also have to be able to renumber items in the menu so there are no blank spaces, or to handle items that are deleted. And, we have to support some method of rearranging items in the menu.
Getting the next item number for the menu is through the OnClick event of an "Add" button. The number is determined by the following code line.
ItemNumber = DMax("ItemNumber", "tblMenuItems", "MenuID = " & [MenuID]) + 1
In order for the entries to be displayed together the items should be in order and start from the number 1. The section of code for this renumbering selects and updates all items in the menu to insure this happens.
strSQL = "SELECT MenuID, ItemNumber, ItemText, Command, Argument FROM tblMenuItems " & _
"WHERE (((ItemNumber)<>0)) and ([MenuID] = " & Me![MenuID] & ") " & _
"ORDER BY ItemNumber"
Set db = CurrentDb
Set rst = db.OpenRecordset(strSQL, dbOpenDynaset)
rst.MoveFirst
i = 1
Do
rst.Edit
rst!ItemNumber = i
rst.Update
rst.MoveNext
i = i + 1
Loop Until rst.EOF
Renumbering is also important when deleting entries or arranging items, so the function is executed from several points in the code. For example, the event that monitors the deletion of records is the After Del Confirm and the only thing it does is renumber the menu items.
Though I don't discuss that here, we will also need to have a user-friendly way to delete menus, navigate menus, and prompt if the user attempts to add too many items or use invalid commands. Another area that required some original coding was moving items up and down in the menu. Download the Sample Database from the link below and see the code behind the editmenu form for the algorithms used for that.
This database also has code that allows you to accept parameters at the bottom of the form. That's what the Expanded field in the table is all about. I just haven't had time to write about it yet. This is a first edition, so there are many features that could still be added, and styling that can be done to make the system look more professional. One could even emulate the Access Switchboard Manager's method of using three levels of popup forms and buttons for the items. If you improve it and make it public domain, let me know. I might add an additional link on this page to point to it.


