| « Menu Manager as the New Switchboard Manager | Customizing the Access Switchboard » |
Overcoming Access Switchboard Limitations
This a second article on using the Microsoft Access Switchboard. I use this feature all of the time, although I don't see many other Access programs that do. Part of that may be the limitations of the feature. One limitation is that you can't have more that 8 items per menu. A second limitation is that only a very limited number of actions are available to the Switchboard.
Eight Item Limitation
The Switchboard provided by Microsoft Access limits you to eight lines per switchboard page. That's a reasonable number, if there has to be a limit. Increasing the limit to 9 or 10 is easy to do, though. We can change how the Switchboard form operates but we can't change how the internal Switchboard Manager handles that. The Switchboard Manager is the internal tool used to edit the Switchboards, or menus.
Open the Switchboard form in design mode and add 2 more option sets (button plus text label)below the existing ones. You can do that easily by selecting the last two option sets, copy (don't deselect) and then paste. They will appear just below the existing ones and closely aligned. Next, open the properties for the first new control, make sure that the first new button is named Option9, the text is OptionLabel9, and that the On Click refers to =HandleButtonClick(9). Do the same for the other new button using the number 10.
Now go to code behind the form and edit the FillOptions function. It is called be the OnCurrent event of the form. One way to do that is when the Switchboard form is opened in Design View. In the Design tab, click on the icon in the very top right to view code. The code will have a line with
Const conNumButtons = 8
Change that to
Const conNumButtons = 10
You still can't add more that 8 items using Switchboard Manager, but you can add the extra two items to the menu by editing the Switchboard Items directly. See the section below explaining the structure of the Switchboard Items table.
Function Limitations
A second limitation is that the provided Switchboard only supports eight actual functions, and you can only add these actions to a menu from the Switchboard Manager. The eight functions that you can use are:
- Go to another switchboard
- Open form in Add
- Open form in Edit
- Open report in print preview
- Design Application (Run switchboard manager)
- Exit
- Run macro
- Run code
It is true that with Run macro and Run code you can do just about anything if you create the macro first, but that is time consuming and shouldn't be a necessity. There is a fix for this but it is only semi-automatic. You can alter the code behind the form to do other commands but you can't use the Switchboard manager to add those commands. Here's how to accomodate additional types in a Switchboard menu. For each additional option, add a new command and then the instructions to process that command.
Function Constants
In the HandleButtonClick function in the code behind the form, there is a section of constants.
Just below
Const conCmdRunCode = 8
add two new constants
Const conCmdOpenTable = 9
Const conCmdRunQuery = 10
Function Code
Next, find the select statement further down in the function that associates the command with the option.
Just below
' Run code.
Case conCmdRunCode
Application.Run rs![Argument]
Add the two new functions associated with the new constants.
' Open a Data Table
Case conCmdOpenTable
DoCmd.OpenTable rs![Argument]
' Run query.
Case conCmdRunQuery
DoCmd.OpenQuery rs![Argument]
Unfortunately again, you can't use the Switchboard manager to allow you to add them to a menu your are editing. That requires manually altering the Switchboard Items table, which is where all of the options are stored.
Manually Editing Switchboard Items
Adding the extra items mentioned in the first part, or using one of the new functions in a menu requires a little explanation of the Switchboard Items table. The table contains the fields SwitchboardID, Item Number, Item Text, Command, and Argument.
SwitchboardID is the key to each set of commands that makes up a menu screen. All lines with the same ID are items on the menu. Item Number indicates the order of the items in the displayed menu. Item Number 0 is the name of the menu. Itemtext is what is displayed for each item. Command is the command that will be executed. These are the numbers that the constants above refer to. Finally, the argument is either the ID of the switchboard, or the name of the object to be opened. If the Command is 1, then the argument will be a number.
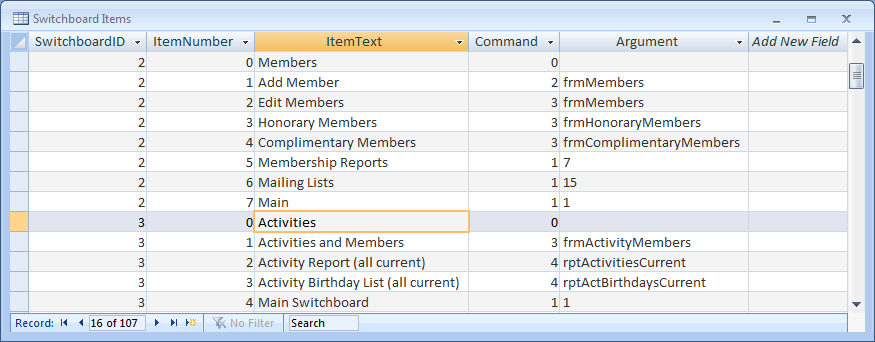
Now to modify the table. Sort the table by SwitchboardID and find the menu where you want to add the new functions. If there is only Item numbers 1,2,3,4 for SwitchboardID 3, you would want to add the option in SwitchboardID number 3 with the next available Item number, 5. Here's what you would enter in each field of the table.
- Create the new record with 3 as the SwitchboardID
- Enter the next Item Number
- Enter the text that will be displayed in the Switchboard
- Enter the number for the command (9 or 10 for one of the new commands)
- Enter the object (form, table, etc.) being executed in the argument field.
Close the table, open the Switchboard, and navigate to the new options.
Renaming and Copies
Incidentally, you can change the name of the table used in the code, or use a different menu if you want. The Switchboard doesn't have to be named Switchboard, and the table doesn't have to be named Switchboard Items. You can copy/rename either or both. You could even have multiple Switchboards for multiple users. You will have to modify the code behind the new forms to point to the correct table, but that's as easy as using find/replace. Keep in mind that the Acces Switchboard Manager only works on the Switchboard Items table.
The only way to handle the limitations of the Switchboard Manager is to create a new one that supports more than eight items, and more than the eight functions available. That's what I did in Menu Manager as the New Switchboard Manager.
![]() This entry was posted on November 30th, 2012 at 09:12:00 pm by Dana Bell and is filed under Information Technology, Professional, Microsoft Office, Access.
This entry was posted on November 30th, 2012 at 09:12:00 pm by Dana Bell and is filed under Information Technology, Professional, Microsoft Office, Access.