| « Don't Forget These ACA Exemptions | VITA: Day One » |
Behind the AOTC Worksheet
Introduction
Note: This is an IT article, not a tax article.
As a part of a campaign to increase awareness of education tax credits I created an AOTC worksheet. The Excel version of the worksheet is demonstrated in my article Amending for Education Credits and includes the simple formulas being used. There is also a PDF version of the spreadsheet that I’ve made available for download and it calculates the values based on the four entries you make.
Creating such a worksheet begins with a simple export of a Word document to PDF. Adding the calculation logic of the worksheet requires a little more work and a full version of Adobe Acrobat. Using it only requires the Acrobat Reader.
The process used to tap into a PDF’s intelligence can be used to create other files that can help clients, users, members, or staff do similar calculations without the need to have or use spreadsheet software. Of course, it is not an Excel replacement, but there are cases, as here, where it can be quite handy. Acrobat has many other abilities that could be integrated in the workflow of a professional office as well.
Create Document
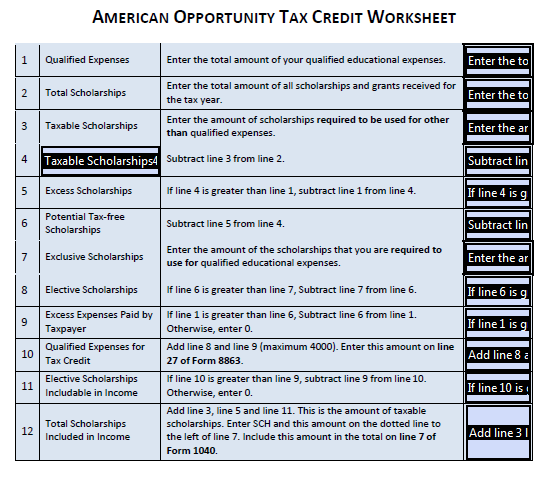
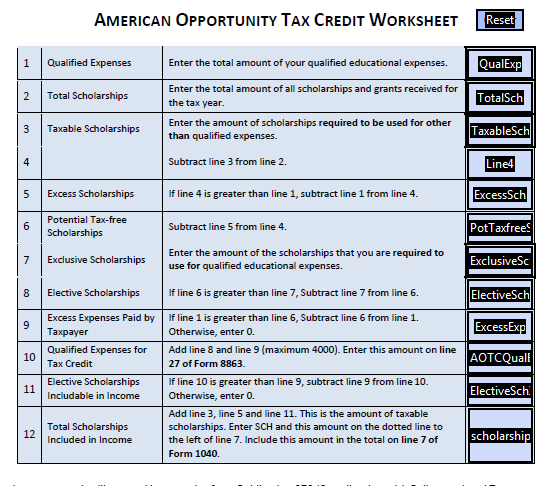
The first thing that I do is create a document and add the table that calculates the AOTC. I started this in Word and then printed to a PDF file. You may also be able to save or export to a PDF. You should make sure the formatting and alignment is the way you want it because it’s difficult to impossible to make major changes in a PDF. Modifying the form for user form-filling will require you to set fields and add calculations. There are 12 fields in this worksheet but the form has only four fields the user needs to enter information into and they have been highlighted with a wider border.
Open PDF
If the PDF doesn’t open automatically, open it with Adobe Acrobat.
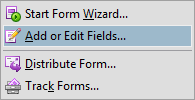
Add/Edit Fields
With the PDF open, select Forms on the menu and then Add or Edit Fields…
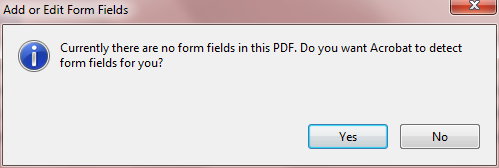
Detect fields
Acrobat makes it easy by offering to detect possible form fields in the document. You can manually add other form fields if you need to. Select Yes.
With fields detected and added the form will look like this.
Once all the fields are added, you could allow users to make all their own calculations. The instructions are there but the purpose of this guide is to show how to let Acrobat make the calculations for the user. For that you will need to name the fields and add code to make the calculations.
Name fields
The name of each field comes from the adjoining text. A few fields may be added that will not be used, such as the Line 4 Taxable Scholarships. Clicking on any field will make it active and highlighted in blue. You can then delete or edit the field properties. For the Taxable Scholarships field in the left column I simply click and delete. Then I rename the other fields.
Right click on the field and select the menu option to Rename fields, and enter a short meaningful name for the field. Do that for all fields to be used.
The following shows all fields renamed for my form.
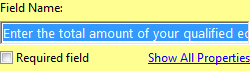
Properties
You can also right click and edit properties. From this menu you can rename the field, add any tooltips and set other properties. For the line 10 properties, I’ve added the tooltip text shown. It is best to rename all the fields before going further since the formulas will use the names assigned.

Add formulas.
After all the fields have been renamed, for each field, go to the properties again (right click). Select the end tab labeled Calculate. This is where you enter the formulas needed to make the calculations. All of the formulas in this form use a custom calculation script in the Javascript language. Javascript is a popular language for web pages. The scripts here are basic with limited syntax. With a little study you should be able to determine how to assign variables, add, subtract, and use conditionals (if statements).
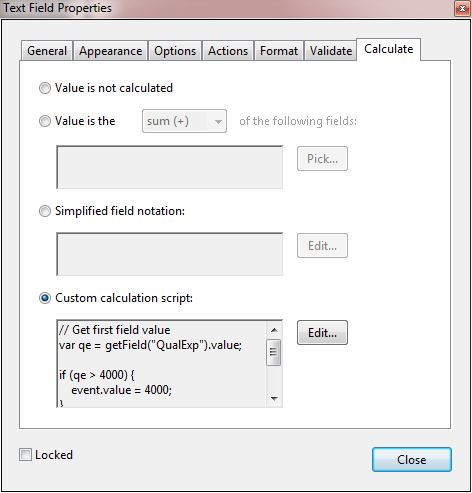
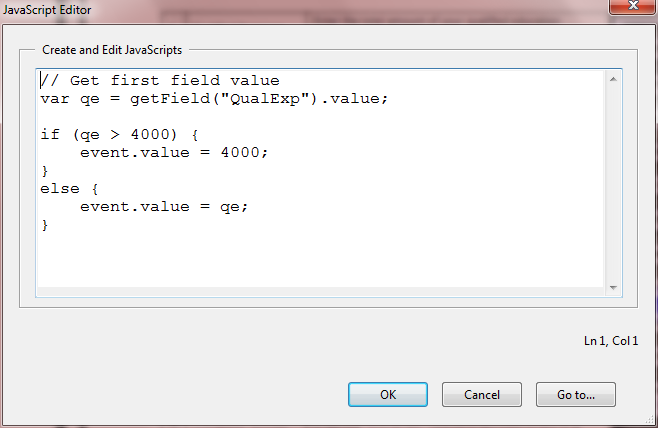
In order to edit the script, click the Edit button to the right of the selected box. Following is the script for line 10 (AOTCQualExp). The script gets the value from line 1 and then determines the appropriate value for this line. In pseudocode this says
If the value in line 1 (field named QualExp) is greater than 4000, then the value in this field is 4000, otherwise this value is the same as the value of QualExp.
Reference
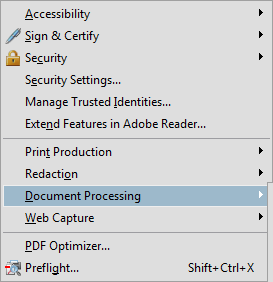
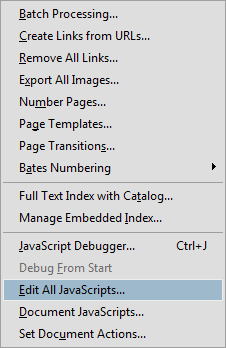
When you have finished adding all the scripts you can see them in a single document from the Advanced menu in Acrobat. Select document processing and then Edit All Javascripts.
Set Read-Only
Remember that the user only enters values in four of the fields in this form, with the rest being self-calculating. For fields that do not require user input, set the Read-Only attribute. This is done by checking the Read-Only box in the first tab under Properties.
Clear button
In order to simplify the use of the form you can also add a button to clear the form. To do this, go to
- Tools > Advanced Editing > Button, and draw out a box that can be click to clear the form. Name it.
- Right click for Properties > Actions, and select the action to Reset a form.
- Properties > Options > Label, and enter the text to be displayed on the form.
Save!
Test and Re-test
The only thing left to do now is test and re-test the form calculations and make corrections where needed. When you are pleased with your work, save, backup, and distribute the form.
![]() This entry was posted on February 1st, 2015 at 10:25:00 am by Dana Bell and is filed under Information Technology, Computing, Professional.
This entry was posted on February 1st, 2015 at 10:25:00 am by Dana Bell and is filed under Information Technology, Computing, Professional.