| « Tax Update Quickie | Getting Ready for 2013 » |
Microsoft Word Outlining Primer
Introduction
If you believe the endorsements of others I'm an expert in Access and Excel. I certainly don't know everything about either program, but compared to others, I’ve probably better harnessed the power of those programs than most. I suspect I could probably be considered an expert in Word too, although that expertise may not be as understandable. Employers and evaluators probably consider expertise in Microsoft Word as the ability to do basic formatting of Word documents since there are many that don’t know how to do that. Although basic formatting is really nothing to brag about, it may be all they really need. If people really knew what you can do with Word they might be able to see the different levels of expertise that might be possible.
As I evaluate the documents of others, I see the sloppiness of others in formatting Word documents. Many of the documents I see use indents when they should set margins correctly, use multiple generic tabs instead of setting up the tabs they need, and even use spacing to arrange columns. With this inconsistent use of formatting I can see how they struggle to get documents to look right. It's true, the document may look okay, but there are proper ways to set up and use tabs, indents, margins, and when you learn to use them, they are much more efficient. There are rules behind the formatting options provided by Microsoft, and using those rules is one way to keep document formatting organized.
Being organized is one of my characteristics and one way I do that is by using the features provided by a software package such as Microsoft Word. With Word's outlining you can really stay organized. Organized outlining helps you create longer documents without being confused by all the details. Word outlining helps by providing levels of details, and if the outlining is linked to Microsoft styles the aesthetics are more appealing as well.
Outlining
Multi-level lists
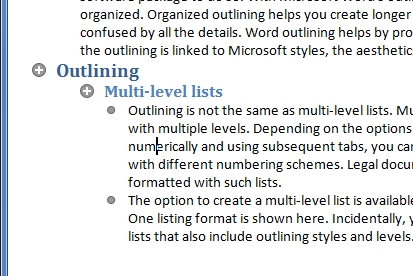
Outlining is not the same as multi-level lists. Multi-level lists are ordered lists with multiple levels. Depending on the options selected, you can list items numerically and, using tabs you can indent and add levels of detail with different numbering schemes. Legal documents (like the Internal Revenue Code I’ve been studying) are quite often presented with such lists.
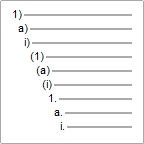
The option to create a multi-level list is available from the Paragraph panel. One listing format is shown here. Incidentally, you can also create multi-level lists that also include outlining styles and levels.
Document Outlining
Document Outlining, instead, is guided by the styles/outline level being selected. This type of outlining can be seen in most textbooks, with chapters, section heads, subsections, etc., Each level is characterized by a change in font formatting rather than numerical indicators. Using outlining in this way helps the reader to follow the discussions in the text. This outlining can also help a writer organize his thoughts as he presents the content to the reader.
Outlining with styles
Document Outlining is actually relatively easy to implement. Common built-in styles in Word have outline levels built into the style. The style names that contain outlining naturally are Heading 1, Heading 2, etc. In conjunction with these styles, I usually use the Title and Subtitle styles for the same document although they do not have outline level settings.
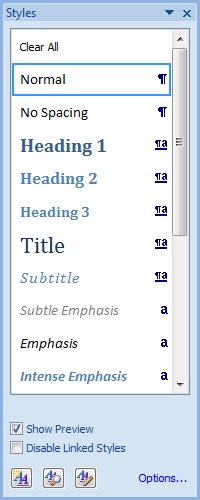
Some of the outlining styles show up automatically in the styles panel.
You may not be able to see all of the built-in outlining styles by default. You can see a more complete list of the outlining styles by selecting the Styles expanding pop-up at the bottom right of the Styles menu. You can also use Ctrl-Alt-Shift-S to open the same menu.
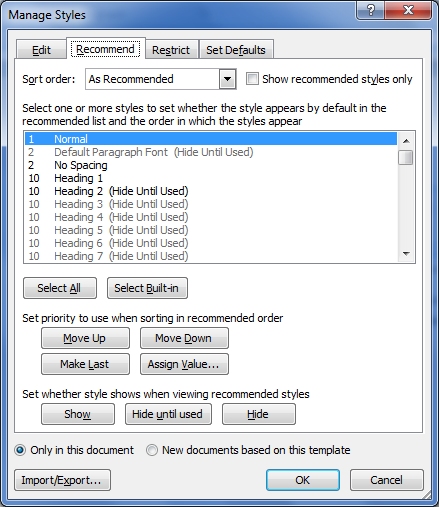
Even then, some of the outlining styles may not be shown if have not used them. To change that you can go to Manage Styles > Recommend and change the option of Hide until used to Show for the styles you want to see every time.
Keyboard shortcuts
I don’t use this personally. Instead I use keyboard shortcuts to change levels for a paragraph. You do this with the Alt-shift and Arrow key combinations. If I want to change a Heading 2 to a Heading 1, I just press Alt-shift-left arrow when I am in that heading. Alt-shift-right arrow moves heading in the other direction.
Document Map
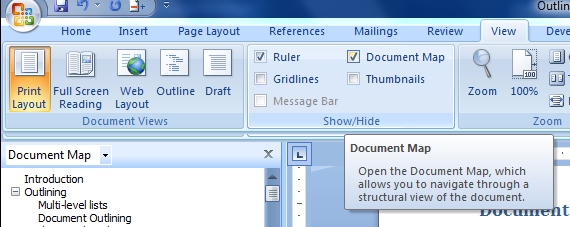
One of the best features of Word's outlining feature is the Document Map. The Document Map shows the headings in a panel to the left of the document. To show the map, go to the View menu and check the Document Map box.
The map shows the headings in an indented list and with that map you can see what items are subheadings of a subject. By clicking on one of the headings there you can also go to that point in the document.
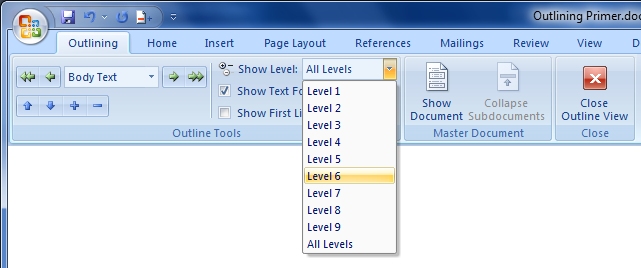
Each heading that has subheadings has an expanding icon to the left, with [+] or [-] depending on whether it has been expanded or not. By collapsing the subheading you can show only the main headings in the map. By default, Word shows all headings in the Document Map. If at one time you want to quickly see only a certain number of levels you can specify the number of levels by going to outline view and selecting the number of levels. By selecting Level 3, levels 1 through 3 will be shown by default. Then switch back to Document View. You can still use the Document Map to expand or collapse the levels.
Outline View
Speaking of outline view, there are a few features there that you can use to re-organize a document.
In Outline View you can see how the levels and text are organized. For a better overview of the document you can select the number of levels to show, or expand/collapse individual levels by double-clicking on the circled + sign, much like in the Document Map.
The Document Map is usually all I use, but Outline View will also let you move sections up or down in the document. Simply select the header and drag it up or down. Be careful to put it in front of a header with the same level. You can also promote or demote a section in the document by dragging the + sign to the left or right. Unless you’ve marked a specific area, this promotion affects every level in the section. For example, if I promote from Heading 2 to Heading 1, the subheadings are also moved, i.e. from Heading 3 to Heading 2. That’s something you can’t do in Document View.
Styles or Outline Level
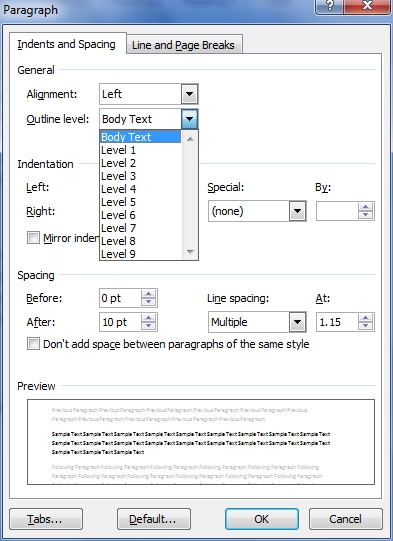
When using the styles to do this outlining, keep in mind that the outline level is a setting in the style being used. To see what outlining level is associated with any style, select formatting > paragraph > indents/spacing and change the Outline Level. Heading 1 is Outline level 1. Though the standard headings can't be changed you can add other styles with the same level number if you have a good reason for that.
You actually may have to use this menu option to fix formatted or imported text. When formatting or importing text, some paragraph may have an outline level set so you may have to set it to Body Text so it doesn’t mess up your outlining.
Pasting Options
Word has options to allow you to paste text as formatted, unformatted, paste as plain text, and other options depending on the source. You can also set the default (Word Options > Advanced > Cut, copy, and paste) for pasting from different sources. Unfortunately, Word apparently doesn’t have an option to clear outline level for imported text.
Formatting
Another reason to use this option may be due to formatting automatically taking on outline levels, usually Level 1. Sometimes it doesn't show until the document has been saved/closed and then reopened. There may be some Word logic that dictates this, but I consider it a flaw in Word. If there is a lot of that going on, you can use Find/Replace. In Find/Replace, select More and select the formatting you want to find and/or replace.
Toolbar shortcut flawed
If you are like me, you might consider using a shortcut button added to the Quick Access toolbar In fact, there is a menu icon that allows you to change the outline level without going through the Paragraph formatting dialog. You can set this up by going to Quick Access > More Commands > Show All and adding Outline Level.
If you use this method on text that has been formatted in other ways, make sure the results are what you expect. It may clear some of your formatting. The paragraph formatting dialog doesn’t have this side effect.
Easy Table of Contents
Other than the organization and consistent formatting of a document, using outlining has another perk. When your document is formatting with outlining, you can easily create a table of contents for it. Position your cursor where you want the Table of Contents to appear in the document and then from the References menu select the Table of Contents option in the first panel. You can then select one of the built-in Table of Contents or select Insert Table of Contents at the bottom and select the options you want.
Navigable web document
You may notice one of the standard options in the menu is to “Use hyperlinks instead of page numbers” under Web preview. See my previous article on creating CPA study notes to see how I used that feature.
Quick PowerPoint
Yet another advantage of outlining is you can use it to create quick PowerPoint slides. You do this by importing slides from a Word document. In PowerPoint, in the Insert New Slide drop-down select Slides from Outline.
This creates a new slide for the Title style and each Level 1 heading, with subheading as subpoints on the slide. If your document is long with a lot of level 2 or higher headings you may want to reformat a copy of the document with Heading 1 styles to work with this PowerPoint feature. That’s one place where Outline View might come in handy.
Thematic Alterations
Finally, a cool thing about using outlining and styles is that if text and heading is styled in a Word document you can quickly change the look of it by selecting a different theme from the Page Layout menu. You can either change the whole document theme, or just change the color or font theme.
